During the winter months it’s ideal to make sure your equipment and tools are season ready. Taking the time to tune up, calibrate, or replace equipment and tools can save you money during the busy months. That’s why we’ve reached out to Bob Hartman for a refresher on the proper way to calibrate your spreaders.
From Bob:
As a spreader ages with wear and tear, its condition may affect the flow and rate of material applied to the turf. Spreaders must be properly calibrated if they are to deliver granular fertilizers and pesticides to turf at the correct label rates. If calibration is done incorrectly or it is not done at all, the product may be misapplied and either too much or too little of the product will reach the turf which could become costly.
Spreaders can be calibrated in several ways, but the following method is relatively simple, fast, and accurate. It is one of the most common ways your spreader but always check your manufacturer specifications. You may need a scale for weighing the material to accurately calibrate and measure product output. It is always important to calibrate new spreaders. During shipping, a spreader can move and shift throughout the transit process.
Broadcast Setting Matrix
How to ensure your spreader is properly calibrated: Make sure the drop holes in the bottom of the hopper are fully open when the Rate Control handle is on #30. If not, please adjust control cable or control rod to allow for a full open hopper position at #30.
Rod Type Adjustment

- Open the shut-off so that the drop holes are completely open as illustrated to the right.
- Review the Control Lever position – if it is set so that the forward edge is at #30, you are calibrated. If not, you need to adjust the control rod at the pivot bracket shown in Fig 1.
- If your shut-off is not able to open fully as in step #1. Loosen the top nut a few turns, then loosen the lower nut so that it allows you to push the shut-off open fully. Next tighten each nut so that they contact the pivot bracket without moving it, and then carefully tighten each nut fully so they do not loosen during use. Recheck adjustment as outlined in #1 above.
- If your shut-off is able to open fully as in step #1, but the Control Lever is not at #30. Loosen the top nut a few turns, then loosen the lower nut so that it allows you to push the Control Lever to #30. Next tighten each nut so that they contact the pivot bracket without moving it. Carefully tighten each nut fully so they do not loosen during use. Recheck adjust as outlined in #1 above.
Cable Type Adjustment
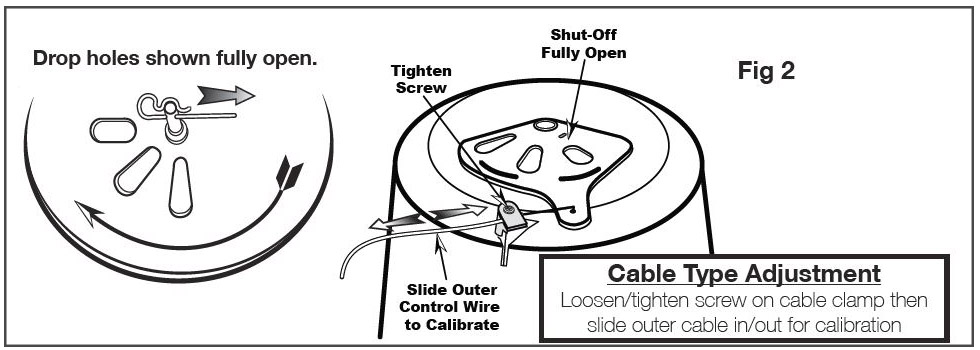
- Open the Control Lever so that the shut-off and drop holes are completely open as illustrated above right.
- Review the Control Lever position so that the indicator is pointed to #30, if it is your calibration is correct. If not, you need to adjust the control cable at the cable clamp on the underside of the hopper as shown in Fig 2.
- If your shut-off is not able to open fully as in step #1. Loosen the cable clamp screw slightly so that you can slide the outer cable out so that the shut-off is fully open. Next tighten the cable clamp screw securely. Recheck adjustment as outlined in #1 above.
- If your shut-off is able to open fully as in step #1, but the Control Lever is not at #30. Loosen the cable clamp screw slightly so that you can slide the outer cable in so that the Control Lever opens to #30. Next tighten the cable clamp screw securely. Recheck adjustment as outlined in #1 above.
Establishing a Setting Rate
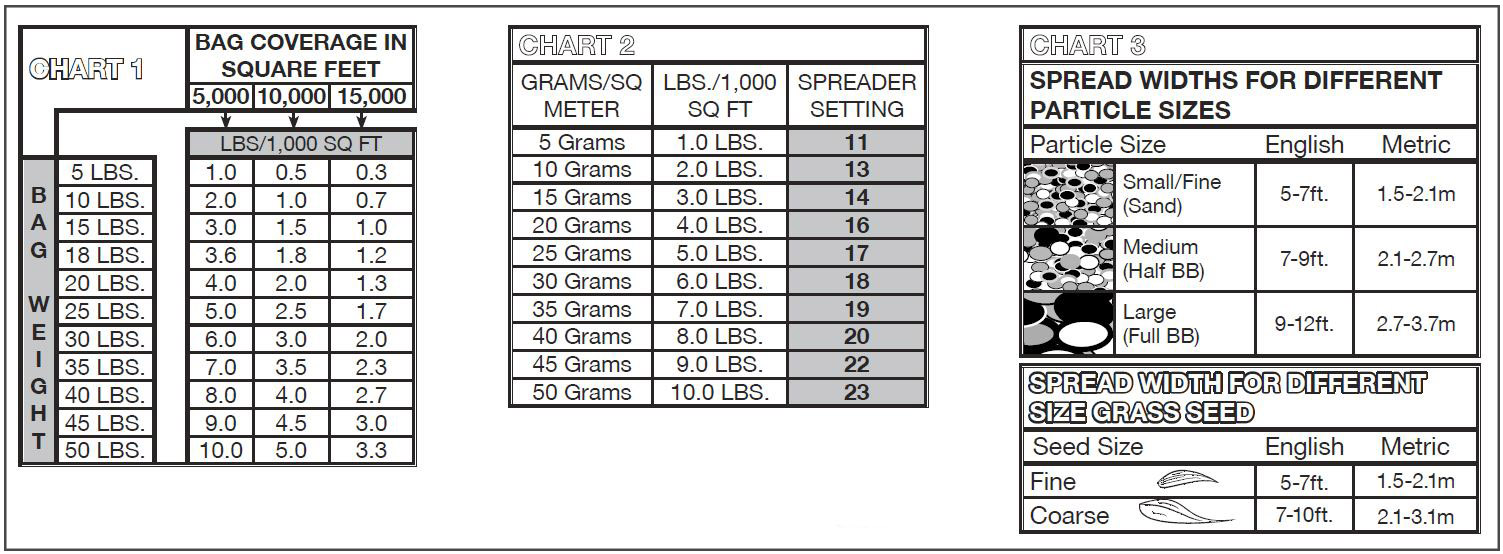
- Step 1: Use Chart 1 to estimate the number of LBS/1,000 square feet of coverage (Example: 20 LB. bag with 10,000 square foot coverage = 2.0 LBS/1,000 square feet)
- Step 2: Find the closest LBS/1,000 square feet in Chart 2 that you estimated using Chart 1 (Example: 2.0 LBS/1,000 square feet = Spreader Setting of 13)
- Step 3: Determine the Spread Width by evaluating the particle or seed size in Chart 3 to determine the Spread Width between Spread Paths
Spread Path
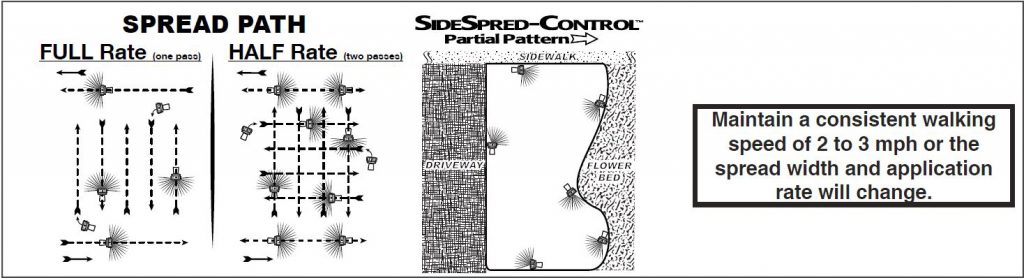
Full Rate is one pass and half rate is two passes. It is important to maintain a consistent walking speed of 2 to 3 mph or the spread width and application rate will change.
To download full Setting Matrix click here.
Calibration is the best way improve and maximize performance of your spreader. It takes only a few of minutes and helps you apply the recommended amount of material to the turf. It is always best to check your spreader’s calibration at least once a year.
Additional Resources for Calibration:
- https://www.centraltis.com/ask-the-expert-spreader-calibration-for-increased-efficiency-profit/
- https://extension.psu.edu/calibrating-your-fertilizer-spreader
- http://www.simplot.com/pdf/best/useful_info/fert_spreader_calibration.pdf
- https://www.pubs.ext.vt.edu/content/dam/pubs_ext_vt_edu/430/430-017/430-017_pdf.pdf
- http://www2.ca.uky.edu/agcomm/pubs/AGR/AGR211/AGR211.pdf
About Bob Hartman
Bob Hartman is an industry veteran with more than 15 years of experience in the green industry; specifically turf. Bob brings a solid background in both the organic and synthetic methods of feeding turf and plants. His diverse background and experience on the manufacturing makes him an excellent resource to help you grow your business.
Finally, rely on Central to help, whether it’s questions about the newest innovations in agronomics, organic & low-impact programs, or finding the right solutions for a problem area. We stay at the leading edge of the industry and we’re ready to help you grow!